28 Dec 2015I just realized I have a bunch of posts forgotten into my draft folder. I'll dust them up and publish them, using my 3 hours train journey the best I can.
So this one if about a few tweaks I did to the nginx config used on this very own blog.
Prevent access without a hostname
The first one is a small security measure to disallow serving files when accessing the server through its IP address. Only requests that specify a valid hostname will be honored. This will prevent people from accidentally browsing your tree structure.
http {
  [...]
  server {
    listen 80;
    return 444;
  }
}
Defining a custom 404 page
It is always better to serve a real 404 page than the default one. To be able to define a specific 404 page for each website hosted, you have to use the error_page directive.
server {
  [...]
  error_page 404 =404 /path/to/404.html
  # You can also use:
  # error_page 404 /path/to/404.html
  # Which will do a 301 redirect and not a 404
}
Redirect root to www
Finally, one last trick to redirect all requests made to the root domain to its www counterpart. Hosting a website directly on the root domain will cause issues when you have to handle cookies. Cookies defined on a top domain will be send to all requests targeting a subdomain. By hosting your website on the top domain, you expose yourself to sending useless cookies to any subdomains you might create.
Therefore, it is better to host your website on a www subdomain and redirect any requests made to the root to the www subdomain.
server {
    server_name pixelastic.com;
    rewrite ^ $scheme://www.pixelastic.com$uri permanent;
}
Here was a short list of nginx tweaks. It's better published than sitting in my draft folder.
16 Oct 2015I recently gave a talk about memory techniques that I use. I'm posting a summary here for those that could not attend.
The memory I talked about had nothing to do with RAM, but with the memory inside our brain. I read a book named Moonwalking with Einstein, by Joshua Foer and wanted to share what I learned from it.

It tells the story of a journalist that met a memory champion. Like me, he did not know that there were memory contests, and that one could become a champion of it. Nevertheless, he learned several techniques from this champion and in one year was able to enter the world contest himself.
The book is really easy to read, it flows like a novel. But everytime a new technique was explained, I tried it on my own brain, to see if this was working.
Mental images
The first one is not a technique in itself. It's the main brick upon which all other techniques are based. The idea is to understand what our brain can do effortlessly, and what is very hard for it to do. Once we know that, we'll stop asking it to do hard stuff, and only focus on what it is naturally good at.
There are three main elements that makes something easy to remember. First, if it's unique, rare or weird, you'll remember it much more easily than something common and mundane. Second, if you can see it, smell it, hear it, taste it or touch it, than it feels more real and you'll remember it better. Finally, if it makes you feel something, either joy, anger or sadness, you'll have personnaly lived it, so you'll remember.
Another really nice characteristic of our brain is that it can remember things that never happened. You can close your eyes and imagine that a giant dinosaure is walking down your street, breathing fire and burning buildings. This never happens (and never will), but you can picture it. In a few days you might even remember it.
Memory palace
The first real technique is called the Memory Palace. It uses one more thing for which our brain is very powerful: spatial representation. You just have to spend 30s in an apartment you don't know to have an accurate representation of the various rooms, their volume and how they are arranged together. For places you've visited often, this is even more powerful. You can just close your eyes and mentally navigate in your childhood home, your apartement, or your job place.
So the Memory Palace is a way to remember an ordered list of elements, like a grocery list. Instead of writing it down on a paper, close your eyes and mentally walk inside your appartement, and put one element of your list in each room. But do not simply picture you putting it in the room. Emphasize it. Extrapolate it. Make it unforgettable.
For example if you need to buy cheese and eggs, imagine that the walls and ceiling of your kitchen have melting cheese all over them, or that all your furnitures turned to Swiss cheese. Instead of putting 6 eggs in your living room, picture them seated in your sofa, having a drink and a chat. The weirdest, the better.
Then, instead of reading your list, picture yourself walking in your appartement, one room at a time, and the crazy mental images will pop from memory directly. Try it if you don't trust me, it really works even on the first try. The first time I did it I was able to remember a list of 20 elements easily (my appartement is not that big, you can put several elements per room). The best part is that I still remembered the list months later.
Spaced repetition
The second technique is called spaced repetition and is a way to not forget what you learn. We've all experienced it before. On an exam eve, you stay up late and learn as much as you can in a short time. You remember most of it for the exam, but then one week later, you've forgotten everything.
This happens because your short term memory will disappear if you do not call it. The spaced repetition technique lets you remember things right before you forgot them. I personnally use the AnkiDroid application for that.
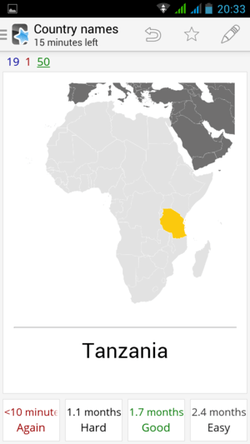
You create (or download) a deck of cards on a subject (all the countries of the world and their flags for example). Each card of the deck is two-sided, with a question on one side and the answer on the other. When you draw the first card of the deck, you'll see the question. You mentally think the answer, then press the "Ok" button to see the real answer.
If you were right, we press the "Good" button and it will ask this same card again the next day. If you're still right tomorrow, it will ask you in a few days, then a week, a month, etc. But if you're wrong it will ask you again in 10mn until you got it right. Everyday it will add a few new cards to the one you've already seen.
The one you've trouble remembering will keep popping day after day until you remember them. The one you remember easily will not be asked often.
The best thing is not even that this works well, it's that it is really fun to do. In one month (20mn in the subway every morning), I learned the whole countries and flags decks. I found it so fun that I then started to learn their capitals and the USA states and capitals.
I would have loved to have known this technique when I was still a student. This would have made my learning so much quicker and enjoyable. Knowing this technique I am now confident that I can learn anything, given enough time, and without pain.
Conclusion
This book told me how to write stuff to my brain so I can easily pull it later. To be honest I rarely use this technique. I do my shopping online and can always check stuff on Wikipedia if I forgot. But I'm happy to know how my own brain is working.
05 Oct 2015Syntastic is one of my favorite vim plugins. It helps me find code issues in my code before committing. I heavily use it with rubocop for Ruby and eslint for JavaScript code.
npm-which
But by default, it uses the globally installed eslint, and I want it to use the locally installed one. So I wrote a small script, called npm-which that returns the path of the specified binary. If it can be found in the underlying node_modules binaries, it will return this one, otherwise it will revert to the global one.
The code takes advantage of the fact that every locally installed binary can be found in ./node_modules/.bin.
#!/usr/bin/env zsh

local npm_bin=$(npm bin)
local bin_name=$1
local local_path="${npm_bin}/${bin_name}"

[[ -f $local_path ]] && echo $local_path && return

echo $(which $bin_name)
You can find the up-to-date version here.
Update the vim config
I then have to tell syntastic the explicit path to the binary using the b:syntastic_javascript_eslint_exec variable. I'll use a local eslint if one is installed, or revert to the global one otherwise. I put that in a after/ftplugins/javascript.vim file in my vim directory.
let b:syntastic_javascript_eslint_exec = StrTrim(system('npm-which eslint'))
StrTrim is a custom vim method that will trim any starting and trailing whitespace from a vim string, and in my case the system call was returning a trailing weird ^@ char.
function! StrTrim(txt)
  return substitute(a:txt, '^\n*\s*\(.\{-}\)\n*\s*$', '\1', '')
endfunction
I can now use different eslint versions and configurations, directly in vim, depending on the current project I'm working on.
Edit: Matthew Smith packed all this into one neat Syntastic plugin. Thanks Matthew!
29 Sep 2015I recently started using Docker more and more for my development needs. I struggled a bit at first with the difference between images and containers, and all the relative commands (build, run, stop, start).
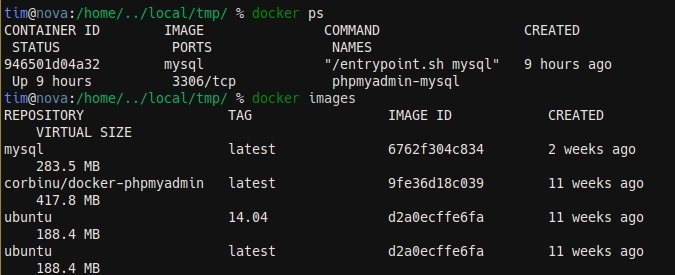
One thing that I was really not happy about was the output of the docker ps and docker images commands. It displays more information than I really need, and it does not fit on small terminal screens.
So I started hacking a couple of wrapper scripts to provide a much better display. And here is what I came up with:
Show me the code
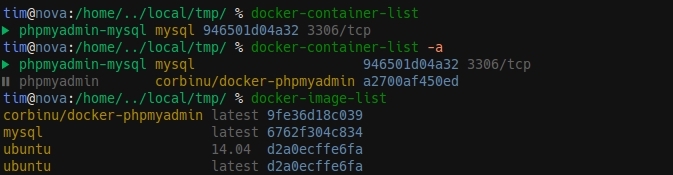
You can find the code for each wrapper script on GitHub (docker-container-list and docker-image-list).
The idea behind each is basically the same. I get the initial output of the command, parse it to extract the data that interests me, sort it, then display it with colors.
The docker ps command has an optional argument of --format that lets you choose what kind of information you'd like to display, using placeholders. The documentation on that is not really great (some placeholders are not defined in the doc), but overall this makes the parsing very easy.
The docker images command on the other hand does not provide such option, so I resorted to split the output in ruby to get the data from the first three columns.
For the sorting of containers, I decided to display first the running containers, then the stopped one. For images, this is a simple alphabetical ordering first on the name, then on the tags.
Then come the colors. I'm already using some kind of similar wrappers for the most common git commands, and I'm already using colors to display tags and hashes, so I re-used those colors here. I tried to stay consistent and use the same color for the same kind of data in both displays (images in yellow, hashes in blue).
I also prefixed each container with a small icon, telling me if the container is currently running or is stopped. I use a patched version of the Hack font here, with Octicons added.
Aliases
Of course, typing docker-container-list and docker-image-list is way too long, so I aliased it to 4-letters aliases. I use docl and doil, that stands for docker container l and docker image list.
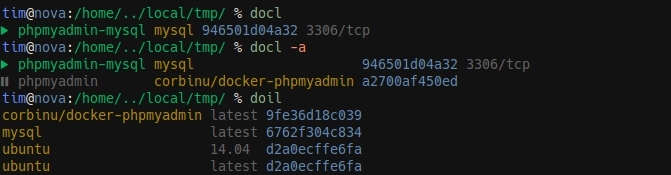
I use this notation a lot in my aliases. They are inspired by vim and follow the {Namespace}{Object}{Action} pattern. The Namespace part here is do for docker (I also have namespaces aliases for apt-get, tmux or git for example). Then I use i or c for images and containers. And finally l for list.
I plan to write another blog post on my git aliases one day.
28 Aug 2015When I started using Linux, the command line was a whole new world to me. The differences between a terminal, a shell, a prompt and a command line were absolutly lost on me.
Now, a few years later, boundaries are much clearer. This post is an attempt at clarifying them.
What is a terminal?
A terminal, or terminal emulator, is a software program that lets you interact with the command line through your shell. The important part is that this is a GUI program.
gnome-shell is the default terminal emulator on Ubuntu, while iTerm is the common choice in the Mac world (I think, I don't own a Mac). Other alternatives include rxvt, termite, terminology or terminator.
They all look like a dark screen where you type commands, but each adds its own features and configuration. terminology for example lets you play video or music directly, and have some advanced visual effects.
terminator is the one I used for a long time. It has a very useful feature that lets you split your screen in different chunks, to avoid alt-tabbing all the time and multi-task easily.
In the end, the terminal emulator is just a wrapper around your shell.
What is a shell ?
The shell is the program that reads your commands (like ls, pwd, etc) and evaluate them. Shells are mostly used as REPL (Read, Eval, Print, Loop). Meaning it is waiting for you to type something in its prompt and pressing Enter. Then it will evaluate the command and display a new prompt for you to type in a new command.
The most basic shell is simply named sh, and the most common one is bash. Other shells (with names like ksh, zsh or fish) also exists and provide different features than bash.
If you're writing shell scripts, different shells are like different scripting languages (but they do share a common basis and most Unix shells you'll find today are bash-compatible). In your everyday life though, what a different shell might bring you is clever tab-completion, output coloring, smart aliases, etc.
I'm personnally using zsh. It offers a really nice tab-completion (even through distant ssh connections), and let me greatly configure what my prompt looks like. oh-my-zsh is a very popular set of plugins to enhance the default zsh experience. I don't personnaly use it, but I've seen countless person using it.
In the end, as all shells are just scripting languages, they are all able to do pretty much the same thing. bash as the huge advantage of being a standard and available almost on any machine, while zsh has a large library of plugins you can download and install.
In the end, the shell is where you'll spend most of your time. You should invest some time into configuring it so you get faster on the command line.
What is a prompt ?
The prompt is simply the line that is displayed in your shell when you type a command. The default is usually something like user@host:/path/ $. This gets displayed at the start of each line and reminds you of who the current user is, on which machine and in which path.
After a while, you're so used to it that you stop seeing it. But such a basic prompt is not very useful. I strongly encourage you to customise it to your needs. As it will get displayd on every new command, it is a nice place to display useful information.
You can even add color to it, and also make use of what is known in zsh as the RPROMPT, the prompt on the right.
In my config, I display the path with a different color depending if I currently have writing rights in it or not. I also color the @ in red if the previous command returned an error code.
When I'm in a git repository, I also change the $ symbol to a ±, and color it differently depending on the status of my current index (green if clean, red if untracked files). I also display the current branch and tag in the right prompt, as well as symbols to tell me if I need to push or pull.
I spend a lot of time in the command line and in git repositories, and I don't want to type git status or git branch too often. It is much better when this information is displayed on my prompt. If you choose your colors well, your brain will be able to parse the information really fast.
In the end, the shell is the line that gets displayed whenever you need to type a command. It is the best place to put output of commands you often type, so you no longer have to.
What is a command line ?
When someone tells you to "type something in the command line", it actually means "type something in your prompt, which is displayed by your shell, which is loaded by your terminal emulator". The command line is all this.
At that moment, we don't really care about what your prompt looks like or if you're using ksh inside rxvt. All we need to know is the output of the command.
Wrapping up
Hopefully, this made this a lot clearer for some of you. Next time, I'll try to talk about tmux, which is a new layer between the terminal and the shell.
tags: